Categories
Money money money...
Could we help you? Please click the banners. We are young and desperately need the money
[solved] Dovecot SSL connection issues - Example with GoDaddy & Letsencrypt certificate / unable to get local issuer certificate / Java IMAP SSL connect errors
The scope of this issue
Connecting to the Dovecot IMAP is causing SSL authentication errors with certain clients. Especially problematic are connections from Java clients. Such a Java SSL connect error reads like this:
Failure attempting to setup IMAP settings with server[yourmailserver.tld] on port [993] with ssl [false] and tls [true] with email [email@address.tld]
java.net.SocketTimeoutException: Read timed out
java.net.SocketInputStream.socketRead0(Native Method)
java.net.SocketInputStream.socketRead(SocketInputStream.java:116)
java.net.SocketInputStream.read(SocketInputStream.java:171)
java.net.SocketInputStream.read(SocketInputStream.java:141)
com.sun.mail.util.TraceInputStream.read(TraceInputStream.java:126)
java.io.BufferedInputStream.fill(BufferedInputStream.java:246)
java.io.BufferedInputStream.read(BufferedInputStream.java:265)
com.sun.mail.iap.ResponseInputStream.readResponse(ResponseInputStream.java:103)
com.sun.mail.iap.Response.(Response.java:133)
com.sun.mail.imap.protocol.IMAPResponse.(IMAPResponse.java:60)
com.sun.mail.imap.protocol.IMAPProtocol.readResponse(IMAPProtocol.java:412)
com.sun.mail.iap.Protocol.(Protocol.java:141)
com.sun.mail.imap.protocol.IMAPProtocol.(IMAPProtocol.java:131)
com.sun.mail.imap.IMAPStore.newIMAPProtocol(IMAPStore.java:763)
com.sun.mail.imap.IMAPStore.protocolConnect(IMAPStore.java:698)
javax.mail.Service.connect(Service.java:366)
These clients won't connect to the server at all in that case. Some other clients may connect periodically (e.g. we experienced issues with certain Android devices).
What is the problem exactly?
If you configure your Dovecot server by the rules, according to https://wiki.dovecot.org/SSL/DovecotConfiguration you might experience exactly this problem. You migiht have set the following 2 parameters in your configuration, which is correct:
ssl = yes
# Preferred permissions: root:root 0444
ssl_cert = </etc/ssl/certs/dovecot.pem
# Preferred permissions: root:root 0400
ssl_key = </etc/ssl/private/dovecot.pem
Of course you can configure with the ciphers and with lots of more SSL parameters but basically configuring Dovecot like this will do the job just fine. Except if you use certain certificates like those from GoDaddy or Letsencrypt. If you use these certificates out-of-the-box the certificate chain is not correct, because Dovecot only accepts ssl_cert and ssl_key as parameters to feed the certificate information. But Letsencrypt and GoDaddy also need the CA certificate to be defined in order to work properly.
If you configured Postfix before, you will know that in Postfix there's a parameter to define the CA certificate. Also there's one to configure the vHosts for the Apache or Nginx webservers. Of course, there's also such a parameter for Dovecot you will say:
ssl_ca = </etc/ssl/ca.pem
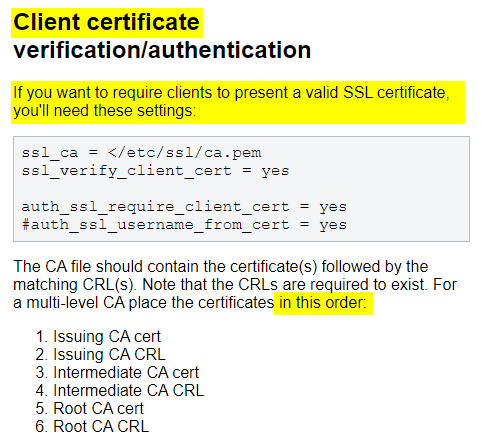
Well yeah, that's what we thought. But take a careful look into the Dovecot Manual:

As you can see, this parameter is only if you want to use CLIENT CERTIFICATE VERIFICATION/AUTHENTICATION. This parameter does not work for SMTP/SSL encrypted connections.
In simple terms: Dovecot does not provide an option to properly set-up a correct certificate chain for SMTP/SSL connections. In our opinion: This is a bug. Because it means that you will need to manually build your certificate containing the full chain and then feed this to Dovecot. In the past, this was not an issue. But since security is being improved constantly more and more e-mail clients do not accept this simple standard Dovecot configuration anymore.
Solution
Well, you'll need to build your own certificate which will contain all information needed by the server to provide not only the certificate to the clients but the full chain. This is really simple to do, because the only thing you need to do is copy the certificates together. You can do this as simple as that:
Let's assume...
...the certificate file is called: ssl.cert (must be in PEM format)
...the CA file is called: ssl.ca (must be in PEM format)
Enter the follwoing command to combine the 2 certificates:
cat ssl.cert ssl.ca > ssl.combined
Then enter the Dovecot configuration:
nano /etc/dovecot/dovecot.conf
or - in case you use properly separated conf files:
nano /etc/dovecot/conf.d/10-ssl-conf
and change the SSL import line from
ssl_cert = </etc/ssl/certs/ssl.cert
to
ssl_cert = </etc/ssl/certs/ssl.combined
then restart Dovecot:
/etc/init.d/dovecot restart
How to test if it works
Enter the following command (change yourmailserver.tld to your mailservers' domain name)
openssl s_client -servername yourmailserver.tld -connect yourmailserver.tld:imaps |head -n12
This will display the first 12 lines of the SSL connect output. If it works it will look like this (in case of GoDaddy):
depth=2 C = US, ST = Arizona, L = Scottsdale, O = "GoDaddy.com, Inc.", CN = Go Daddy Root Certificate Authority - G2
verify return:1
depth=1 C = US, ST = Arizona, L = Scottsdale, O = "GoDaddy.com, Inc.", OU = https://certs.godaddy.com/repository/, CN = Go Daddy Secure Certificate Authority - G2
verify return:1
depth=0 OU = Domain Control Validated, CN = yourmailserver.tld
verify return:1
CONNECTED(00000003)
---
Certificate chain
0 s:OU = Domain Control Validated, CN = yourmailserver.tld
i:C = US, ST = Arizona, L = Scottsdale, O = "GoDaddy.com, Inc.", OU = https://certs.godaddy.com/repository/, CN = Go Daddy Secure Certificate Authority - G2
1 s:C = US, O = "The Go Daddy Group, Inc.", OU = Go Daddy Class 2 Certification Authority
i:C = US, O = "The Go Daddy Group, Inc.", OU = Go Daddy Class 2 Certification Authority
2 s:C = US, ST = Arizona, L = Scottsdale, O = "GoDaddy.com, Inc.", OU = https://certs.godaddy.com/repository/, CN = Go Daddy Secure Certificate Authority - G2
i:C = US, ST = Arizona, L = Scottsdale, O = "GoDaddy.com, Inc.", CN = Go Daddy Root Certificate Authority - G2
3 s:C = US, ST = Arizona, L = Scottsdale, O = "GoDaddy.com, Inc.", CN = Go Daddy Root Certificate Authority - G2
i:C = US, O = "The Go Daddy Group, Inc.", OU = Go Daddy Class 2 Certification Authority
---
If you can see the parameters verify return:1 in the first lines of the output and proper names for the certificates you're all set.
That's it, plain and simple. We hope that this blog post will spare some of you guys the time we required to search for this simple solution.
